Why Odoo's Built-in Scheduler Is Not Enough
If you have worked with Odoo for any length of time, you have probably run into a scenario where a user clicks a button, the browser spinner appears, and then nothing happens for a very long time. Maybe you are generating a 50,000-line sales report as a PDF. Maybe you are sending 10,000 personalised emails. Maybe you are importing a 200 MB CSV file that needs cross-referencing against existing stock records.
Odoo ships with a built-in cron engine called ir.cron. It is perfectly fine for lightweight periodic jobs like clearing temporary files or sending a handful of scheduled emails. But it has a hard set of limitations that become painful quickly in any growing business.
The first problem is blocking. Odoo's HTTP worker processes are finite, typically 4 to 8 on a standard server. When one of those processes gets tied up running a 10-minute report, every other user hitting that same process waits. The second problem is no real retry logic. If a cron job crashes, it just logs the error and moves on. You have no built-in way to retry with exponential backoff, reroute to a different worker, or notify the user when the job finally succeeds.
The third problem is scalability. You cannot horizontally scale Odoo's cron workers the same way you can scale independent background worker processes. The moment you need dedicated resources for heavy jobs, the built-in scheduler becomes a bottleneck.
This is where Celery comes in.
How Celery Works Alongside Odoo
Celery is a distributed task queue for Python. It decouples task creation from task execution. When your Odoo code wants to run a heavy job, instead of running it inline (which would freeze the HTTP request), it simply sends a small message to a message broker — usually Redis or RabbitMQ. That message says "please run this function with these arguments."
On the other side, you have one or more Celery worker processes running independently. They continuously watch the broker for new messages. When one arrives, a worker picks it up, executes the actual work, stores the result somewhere (also usually Redis), and moves to the next task.
Your Odoo request returns immediately to the user with a task ID. The user can then check the progress of that task ID at any time without holding up any HTTP worker. This is the fundamental pattern that makes heavy background processing actually pleasant to work with.
Key Insight
Celery workers are just Python processes. They can import Odoo's own code, connect to your Odoo PostgreSQL database, and call any model method directly. This means you write your business logic once in Odoo, and Celery workers execute it in the background without needing any API layer in between.
The Full Architecture
Before writing a single line of code it is worth understanding what the pieces look like and how they talk to each other.
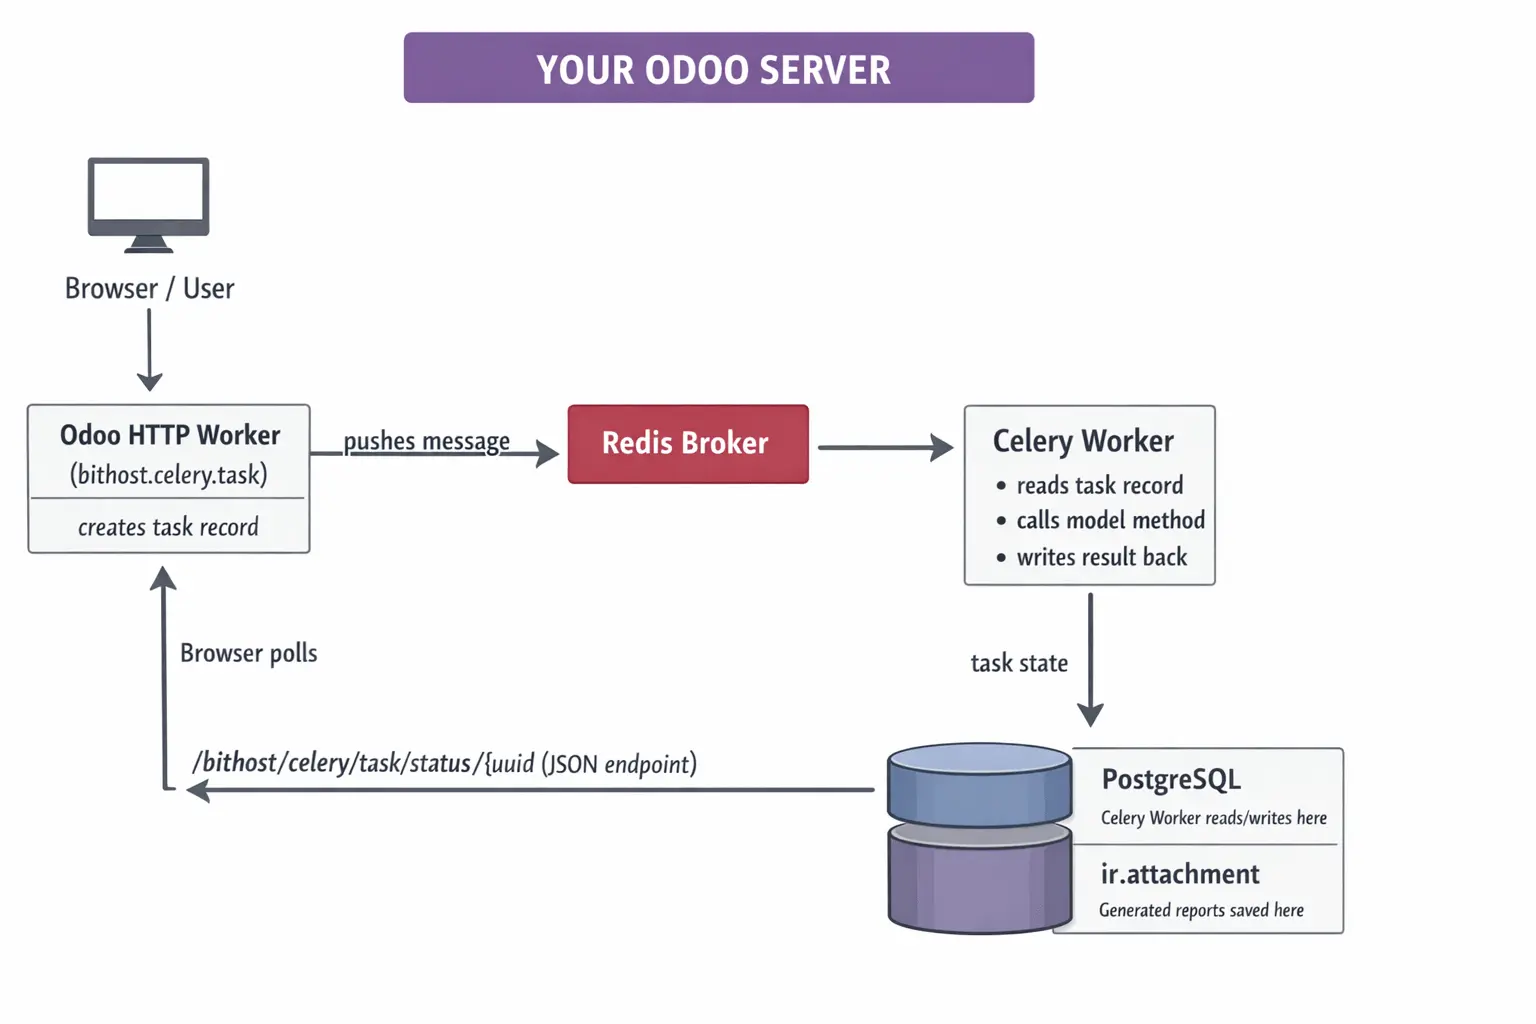
Notice that the Celery worker is a separate process but it connects to the same PostgreSQL database that Odoo uses. This is the key architectural decision. The worker does not call the Odoo JSON-RPC API; it directly imports Odoo's Python layer and calls model methods through odoo.api.Environment. This gives you full ORM access, full security model, and full chatter and mail features, all from the background worker.
Let's move to the steps involved to setup celery with Odoo.
Step 1:Installing and Configuring the Stack
You will need Redis running on your server. It acts as both the message broker and the result backend. On Ubuntu or Debian, installation is a single command.
# Install Redis
sudo apt-get update
sudo apt-get install redis-server -y
sudo systemctl enable redis-server
sudo systemctl start redis-server

# Verify it's running
redis-cli ping
# Expected output: PONG
Next, install the Python libraries into the same virtual environment that Odoo uses. This is important. The Celery worker will import from that same environment.
# Activate your Odoo virtualenv first
source /opt/odoo/venv/bin/activate

# Install Celery and the Redis driver
pip install celery==5.3.6 redis==5.0.1 kombu==5.3.3

# Optionally install Flower for the monitoring dashboard
pip install flower==2.0.1
Step 2: Writing the Celery Worker
The worker script lives outside the Odoo addons directory. It is a standalone Python file that boots up Odoo's registry, creates an API environment, and then waits for tasks from the broker. Here is the core of it.
# bithost_celery_worker.py
import os
import sys
import traceback

# Point to your Odoo installation
sys.path.insert(0, '/opt/odoo/odoo')

import odoo
from odoo import api, SUPERUSER_ID
from celery import Celery

BROKER_URL = os.environ.get('CELERY_BROKER', 'redis://localhost:6379/0')
RESULT_BACKEND = os.environ.get('CELERY_BACKEND', 'redis://localhost:6379/1')
ODOO_DB = os.environ.get('ODOO_DB', 'odoo_production')

app = Celery('bithost_odoo_worker', broker=BROKER_URL, backend=RESULT_BACKEND)

app.conf.update(
    task_serializer='json',
    result_serializer='json',
    accept_content=['json'],
    task_acks_late=True,
    worker_prefetch_multiplier=1,
)

@app.task(
    bind=True,
    name='bithost_celery_worker.run_odoo_task',
    max_retries=3,
    default_retry_delay=60,
    soft_time_limit=3600,
)
def run_odoo_task(self, task_uuid, db=None):
    db = db or ODOO_DB
    odoo.tools.config.parse_config(['-c', '/etc/odoo/odoo.conf'])
    registry = odoo.registry(db)

    with registry.cursor() as cr:
        env = api.Environment(cr, SUPERUSER_ID, {})
        task_rec = env['bithost.celery.task'].search(
            [('task_uuid', '=', task_uuid)], limit=1
        )
        task_rec.mark_running()
        cr.commit()

        try:
            import json
            args = json.loads(task_rec.args_json or '[]')
            kwargs = json.loads(task_rec.kwargs_json or '{}')
            model = env[task_rec.model_name]
            result = getattr(model, task_rec.method_name)(*args, **kwargs)
            cr.commit()
            task_rec.mark_done(result_info=str(result))
            cr.commit()
        except Exception as exc:
            task_rec.mark_failed(error_trace=traceback.format_exc())
            cr.commit()
            raise self.retry(exc=exc, countdown=60 * (self.request.retries + 1))
A few important decisions are reflected in the code above. First, task_acks_late=True means the broker only removes the message after the task has finished executing, not when the worker picks it up. If the worker crashes mid-task, the message goes back to the queue. Second, worker_prefetch_multiplier=1 ensures each worker thread takes only one task at a time, which is safer for long-running database-heavy jobs. Third, retries use exponential backoff via countdown=60 * (retries + 1), so a flaky task waits 1 minute, then 2 minutes, then 3 minutes before giving up.
Step 3: The Odoo Module - Tracking Tasks in the Database
It is not enough to just push jobs to Celery and hope for the best. You need visibility inside Odoo itself — a proper record for every task that shows its current state, who created it, how long it took, and what the result or error was.
The custom module in this article creates a model called bithost.celery.task that tracks exactly this. Here is the structure of the module.
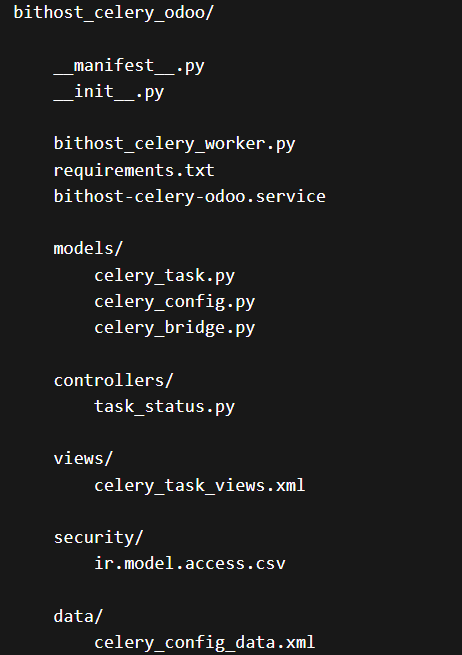
The task model carries all the fields you would expect: the task UUID (used to link Odoo records to Celery task IDs), the model and method to call, JSON-encoded arguments, the state machine with transitions from pending through queued, running, done or failed, timestamps for start and finish, and a computed duration. It also holds the error traceback when something goes wrong, which is invaluable for debugging production issues without having to SSH into the server.
# models/celery_task.py (key fields)
class BithostCeleryTask(models.Model):
    _name = 'bithost.celery.task'
    _description = 'Celery Async Task'

    task_uuid = fields.Char(default=lambda self: str(uuid.uuid4()), index=True)
    task_name = fields.Char(required=True)
    task_type = fields.Selection([
        ('report', 'Report Generation'),
        ('data_export', 'Data Export'),
        ('email_batch', 'Email Batch'),
        ('data_import', 'Data Import'),
        ('custom', 'Custom Task'),
    ])
    state = fields.Selection([
        ('pending', 'Pending'), ('queued', 'Queued'),
        ('running', 'Running'), ('done', 'Done'),
        ('failed', 'Failed'), ('cancelled', 'Cancelled'),
    ], default='pending')
    model_name = fields.Char()
    method_name = fields.Char()
    args_json = fields.Text(default='[]')
    kwargs_json = fields.Text(default='{}')
    error_trace = fields.Text(readonly=True)
    attachment_id = fields.Many2one('ir.attachment')  # for generated files
Step 4: Queuing Tasks from Your Odoo Code
Once the module is installed, queuing a background task from anywhere in your Odoo codebase becomes a single method call. The module provides a convenience factory method create_and_queue that creates the task record and pushes it to Celery in one shot.
# From any Odoo model method — for example in a button action
def action_generate_annual_report(self):
    self.env['bithost.celery.task'].create_and_queue(
        task_name=f'Annual Sales Report {self.year}',
        task_type='report',
        model_name='sale.order',
        method_name='_generate_annual_pdf',
        kwargs={'year': self.year, 'company_id': self.env.company.id},
        queue_name='odoo_reports',
        priority=3,
    )
    return {
        'type': 'ir.actions.client',
        'tag': 'display_notification',
        'params': {
            'message': 'Report generation started. We will notify you when it is ready.',
            'type': 'info',
        }
    }
The button returns immediately with a friendly notification. The report runs in the background and the user gets an Odoo bus notification when it finishes. No spinner. No timeout. No frustrated phone calls to your support team.
For a heavy data import scenario the pattern is identical. You write the actual import logic as a normal Odoo model method, and you call it via Celery instead of directly.
# Triggering a large CSV import asynchronously
def action_async_import(self):
    # Save the uploaded file as attachment first
    attachment = self.env['ir.attachment'].create({
        'name': self.filename,
        'datas': self.file_data,
        'res_model': 'stock.picking',
    })
    self.env['bithost.celery.task'].create_and_queue(
        task_name=f'Stock Import: {self.filename}',
        task_type='data_import',
        model_name='stock.picking',
        method_name='process_import_attachment',
        kwargs={'attachment_id': attachment.id},
    )
Step 5: Async Report Generation
Report generation is probably the single most common reason Odoo deployments start to feel sluggish. A user wants a PDF of 2,000 sales orders with custom grouping, charts, and multi-currency conversions. That can easily take 3 to 8 minutes in QWeb. Here is how to handle it cleanly with Celery.
On the Celery worker side, you have a dedicated task for reports that calls Odoo's own ir.actions.report machinery, saves the binary output as an ir.attachment linked to the task record, and notifies the user with a download link.
# In bithost_celery_worker.py
@app.task(
    bind=True,
    name='bithost_celery_worker.generate_report',
    soft_time_limit=7200,  # 2 hour limit for very heavy reports
)
def generate_report(self, task_uuid, report_action_id, record_ids, output_format='pdf', db=None):
    db = db or ODOO_DB
    odoo.tools.config.parse_config(['-c', ODOO_CONFIG])
    registry = odoo.registry(db)

    with registry.cursor() as cr:
        env = api.Environment(cr, SUPERUSER_ID, {})
        task_rec = env['bithost.celery.task'].search(
            [('task_uuid', '=', task_uuid)], limit=1
        )
        task_rec.mark_running()
        cr.commit()

        report_action = env['ir.actions.report'].browse(report_action_id)

        # Render the report — this is where the heavy lifting happens
        report_data, _ = report_action._render(record_ids)

        filename = f"{report_action.name}_{task_uuid[:8]}.{output_format}"
        attachment = env['ir.attachment'].create({
            'name': filename,
            'datas': report_data,
            'mimetype': 'application/pdf',
            'res_model': 'bithost.celery.task',
            'res_id': task_rec.id,
        })
        cr.commit()

        task_rec.mark_done(
            result_info=f'Report ready: {filename}',
            attachment_id=attachment.id
        )
        cr.commit()
To trigger this from an Odoo action button on the sale.order model, you would write something like this.
# In your sale.order model
def action_async_print_orders(self):
    report = self.env.ref('sale.action_report_saleorder')
    self.env['bithost.celery.task'].create_and_queue(
        task_name=f'Sale Orders PDF ({len(self)} records)',
        task_type='report',
        model_name='bithost.celery.task',  # worker uses generate_report task
        method_name='_dummy',               # not used for report type
        kwargs={
            'report_action_id': report.id,
            'record_ids': self.ids,
            'output_format': 'pdf',
        },
        queue_name='odoo_reports',
    )
Step 6: Live Progress Polling from the Frontend
Users do not want to manually refresh a page to see if their report is ready. The module includes an HTTP controller that exposes a simple JSON endpoint for polling task state. Your JavaScript can hit this endpoint every few seconds and update the UI accordingly.
// In your Odoo widget or OWL component
async pollTaskStatus(taskUuid) {
    const interval = setInterval(async () => {
        const response = await fetch(
            `/bithost/celery/task/status/${taskUuid}`,
            { method: 'GET', headers: { 'Content-Type': 'application/json' } }
        );
        const data = await response.json();

        if (data.state === 'done') {
            clearInterval(interval);
            if (data.download_url) {
                window.location.href = data.download_url;
            }
            this.showSuccess('Your report is ready!');
        } else if (data.state === 'failed') {
            clearInterval(interval);
            this.showError('Report generation failed. Please try again.');
        } else {
            this.updateProgressLabel(`Status: ${data.state}...`);
        }
    }, 3000);  // poll every 3 seconds
}
The controller returns a clean JSON object with the task state, timestamps, duration, a download URL if the task produced a file, and the error traceback only if it failed. This gives your frontend everything it needs to provide a smooth user experience.
Step 7: Monitoring with Flower
Once you have Celery running in production you need visibility into what is happening. Flower is a lightweight real-time web UI for Celery that shows active workers, task queues, task history, failure rates, and worker resource usage. It takes about 30 seconds to start.
# Start Flower on port 5555
celery \
  -A bithost_celery_worker \
  flower \
  --port=5555 \
  --broker=redis://localhost:6379/0 \
  --basic_auth=admin:your_secure_password

# Then open http://your-server:5555 in your browser
For production you will want Flower behind your Nginx reverse proxy with proper HTTPS. Add a block like this to your Nginx configuration.
location /flower/ {
    proxy_pass http://127.0.0.1:5555/;
    proxy_set_header Host $host;
    proxy_set_header X-Real-IP $remote_addr;
    proxy_redirect off;
    auth_basic "Flower Monitor";
    auth_basic_user_file /etc/nginx/.flower_htpasswd;
}
Running Workers with systemd
The module includes a ready-to-use systemd service file that you can drop into /etc/systemd/system/. It sets all the necessary environment variables, points to your Odoo config file, runs as the odoo system user, and restarts automatically if the worker crashes.
# Install and start the service
sudo cp bithost-celery-odoo.service /etc/systemd/system/
sudo systemctl daemon-reload
sudo systemctl enable bithost-celery-odoo
sudo systemctl start bithost-celery-odoo

# Check status
sudo systemctl status bithost-celery-odoo

# View logs
sudo journalctl -u bithost-celery-odoo -f
Separate Queues for Separate Concerns
Run at least two worker pools: one for fast general tasks with high concurrency (8 or more), and one dedicated to heavy report generation with lower concurrency (2 or 4) but higher memory allocation. This ensures a massive 30-minute report does not starve your quick email or webhook tasks.
# Fast general tasks — high concurrency
celery -A bithost_celery_worker worker \
  --concurrency=8 \
  -Q odoo_tasks,odoo_urgent \
  --loglevel=info

# Heavy reports — low concurrency, high memory
celery -A bithost_celery_worker worker \
  --concurrency=2 \
  -Q odoo_reports \
  --loglevel=info \
  --max-memory-per-child=512000
Redis Persistence
By default Redis stores everything in memory. For task state persistence across server reboots you should enable both RDB snapshots and AOF persistence in your /etc/redis/redis.conf.
# /etc/redis/redis.conf
save 900 1
save 300 10
save 60 10000
appendonly yes
appendfsync everysec
Task Timeouts
Always set soft_time_limit and time_limit on your Celery tasks. The soft limit raises a SoftTimeLimitExceeded exception that your code can catch to save partial results and exit cleanly. The hard limit is a SIGKILL that kills the worker process regardless. Set the hard limit 100 seconds above the soft limit so cleanup code has time to run.
Download the Module
The complete bithost_celery_odoo module referenced throughout this article is available for download below. It includes all model definitions, the Celery worker script, the systemd service file, Odoo views with a Kanban task dashboard, the HTTP controller for status polling, and default configuration data. It is compatible with Odoo 16 and 17 Community and Enterprise editions.
After downloading, install it like any other Odoo addon by placing the folder in your addons path and updating the app list from Settings. Then configure your broker URL under Task Queue > Configuration, start the Celery worker service, and you are live.
Need Help Setting This Up?
Bithost specialises in Odoo implementation, custom module development, performance tuning, and server infrastructure for businesses across India and globally. Whether you need Celery integrated into your production Odoo setup or a full ERP rollout from scratch, our team has done it before.
